Stay in touch with hundreds of people using Google Sheets
I’m assuming you have already heard about Derek Sivers and the database he’s been using to stay in touch with hundreds of people. If you haven’t, you can learn more about it from his blog post or even better, his book Your Music and People. Derek recommended some softwares but he ended up programming his own and planned to share it someday. Unfortunately, based on this comment he wrote, it may never be public.
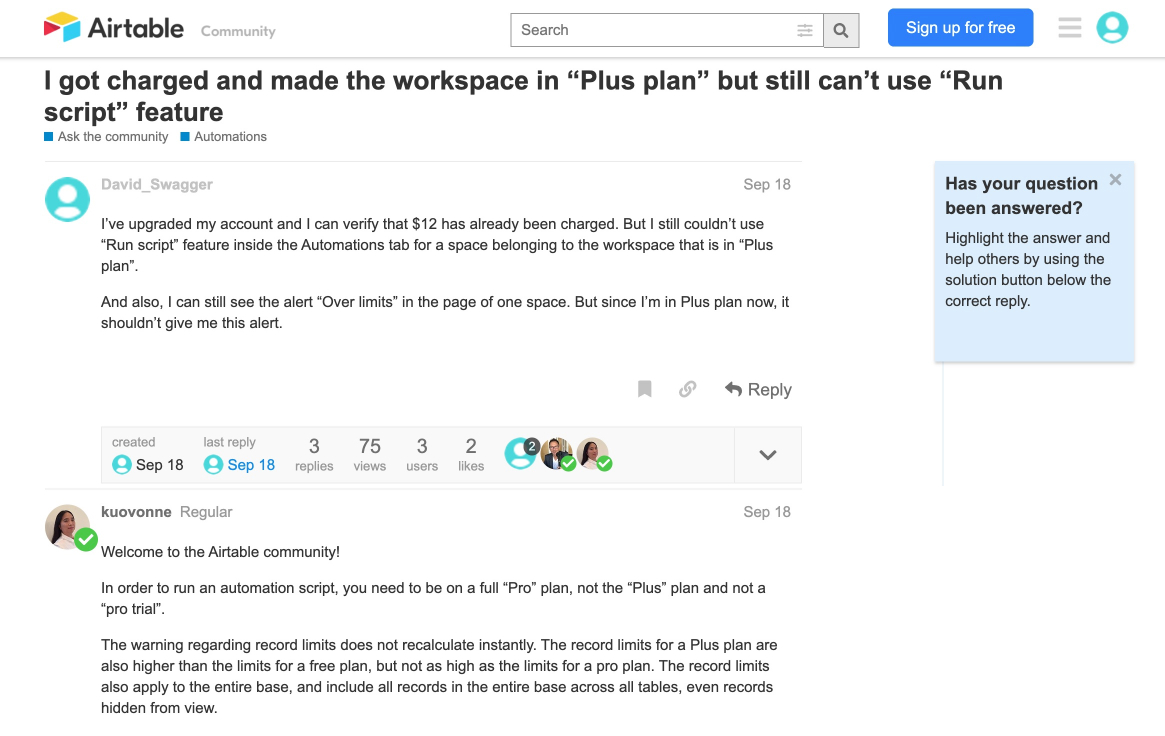
Luckily, Jakob Greenfeld implemented Derek’s system using Airtable and showed us how to do it in his blog post. Thanks to Jakob’s great writing, the instructions are easy to follow. However, there is one problem. If you’re on the free plan of Airtable, you can’t implement this Potential New Contacts feature as Jakob did. When I followed the instructions, I got stuck so I upgraded to Plus plan. But it turns out you have to be on a full Pro plan of Airtable to be able to run scripts. Right now, the “Pro” plan costs $24/month billed monthly and $20/month billed yearly. BTW, the pricing plans of Airtable is very consufing to me. I couldn’t tell from its pricing page which plan I need to be able to run scripts. I even asked for help on its forum to figure this out.
I don’t use Airtable that much so it would be very luxury to me if I have to pay $24/month to run this system. So I spent some time on research and found a way to do this using Google Sheets. It doesn’t need any third party software and all you need is a Google Sheets file. And it’s totally free. Now I’m showing you how.
Step1 - Create empty sheets
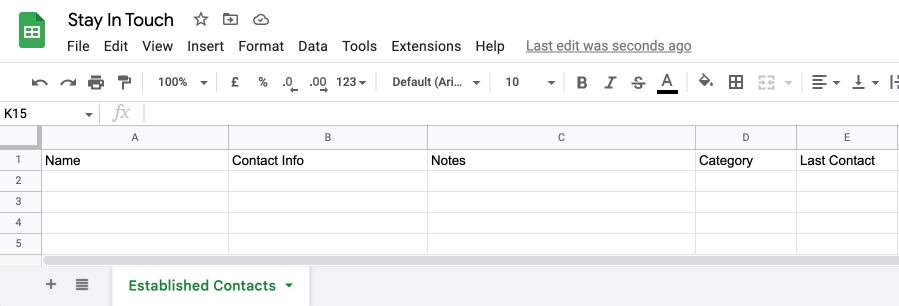
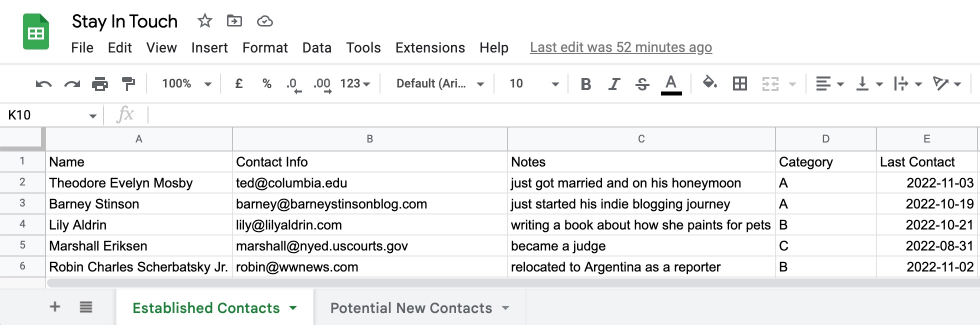
First, create a new Google Sheets file in your Google Drive. I named it “Stay In Touch” but you can choose whatever you want. In this new file, you’ll have a default Sheet named ‘Sheet1’. Rename it to ‘Established Contacts’. Then create five columns including ‘Name’, ‘Contact Info’, ‘Notes’, ‘Category’, ‘Last Contact’. The logic is same as what Jakob uses in his system so if you’re confused about these columns, you can read his post for more details. I’ve put screenshots of demo sheets at the end of this post so that you can use as a reference.
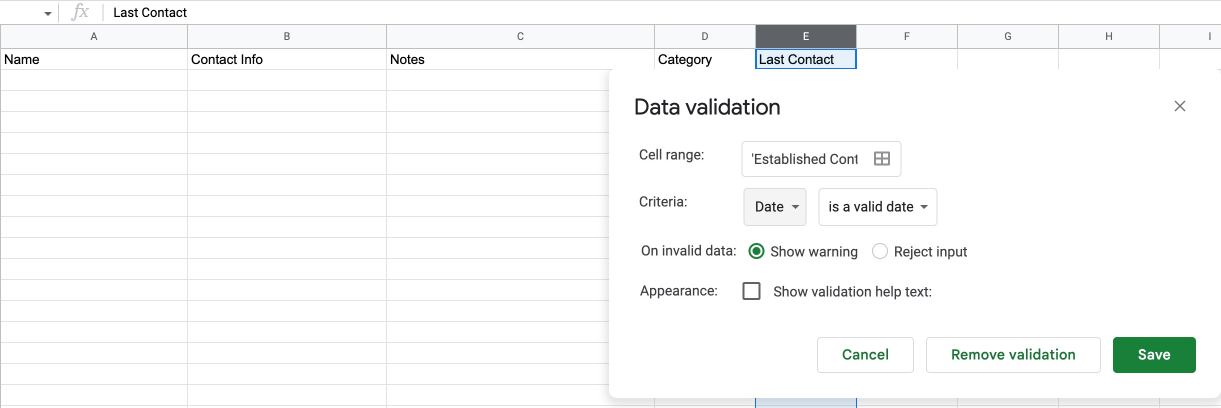
For the column ‘Last Contact’, I’d like to make it show date picker whenever I double click any cell. To achieve this, select the whole column, right click and then select ‘Data validation’. It will pop up a dialogue. Change the value of ‘Cell range’ to 'Established Contacts'!E2:E. Then change ‘Criteria’ to ‘Date’. Keep the default value of the input field on its right, which is ‘is a valid date’. Then click ‘Save’. If everying works, you’ll see a date picker each time you try to edit a cell in this column.
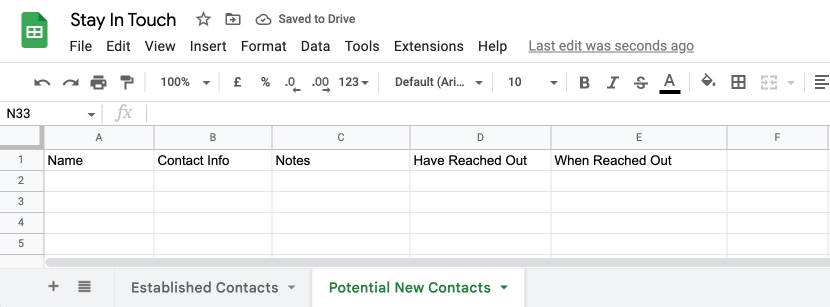
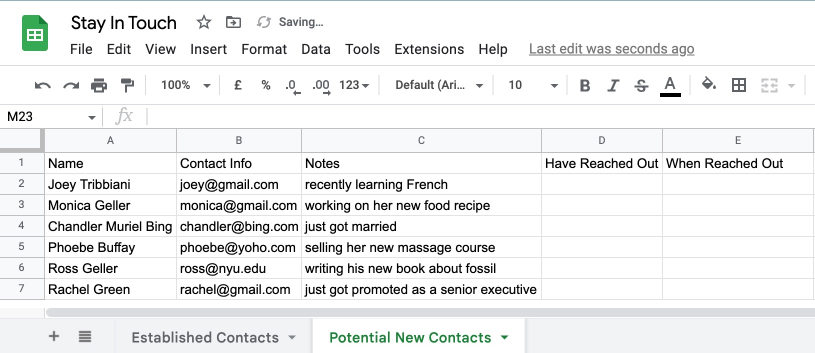
Now we add a new Sheet and rename it to Potential New Contacts. And then create five columns including ‘Name’, ‘Contact Info’, ‘Notes’, ‘Have Reached Out’ and ‘When Reached Out’.
Step2 - Create Apps Script
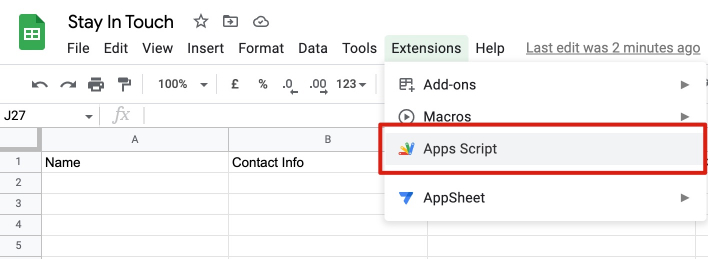
Here comes the most important part. We’ll use Google Sheets’ built-in ‘Apps Script’ to add the automation functionality. The advantage over Airtable is that it’s totally free in Google Sheets. Click the ‘Extentions’ tab in the navigator and then click ‘Apps Script’. You’ll be redirected to another tab. If you’re not familiar with ‘Apps Script’, don’t panick. It’s a cloud-based JavaScript platform that allows uers to write customized code to integrate with and automate tasks across Google products. I’m showing you how to put our code to automate our task.
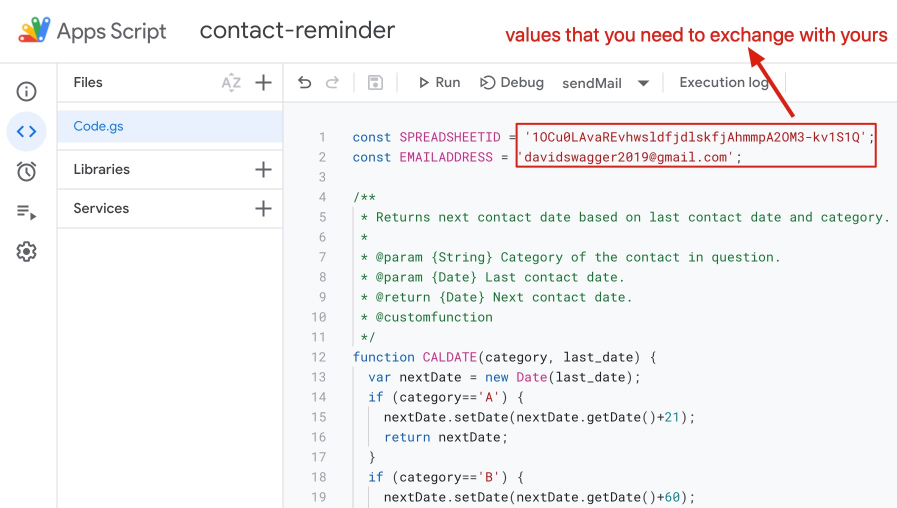
First rename it from ‘Untitled project’ to anything you want. I’m using ‘contact-reminder’. Then delete all the existing content inside the Editor panel. Now copy the code snippet below and past it into the Editor and press Ctrl+s/Command+s to save it.
const SPREADSHEETID = '1OCu0LAvaREvhwsldfjdlskfjAhmmpA2OM3-kv1S1Q';
const EMAILADDRESS = 'davidswagger2019@gmail.com';

/**
 * Returns next contact date based on last contact date and category.
 *
 * @param {String} Category of the contact in question.
 * @param {Date} Last contact date.
 * @return {Date} Next contact date.
 * @customfunction
 */
function CALDATE(category, last_date) {
  var secondDate = new Date(last_date);
  if (category=='A') {
    secondDate.setDate(secondDate.getDate()+21);
    return secondDate;
  }
  if (category=='B') {
    secondDate.setDate(secondDate.getDate()+60);
    return secondDate;
  }
  if (category=='C') {
    secondDate.setDate(secondDate.getDate()+180);
    return secondDate;
  }
  if (category=='D') {
    secondDate.setDate(secondDate.getDate()+365);
    return secondDate;
  }
}

/**
 * Returns the flag of trigger reminder.
 *
 * @param {Date} Next contact date.
 * @return {Number} Whether needs to trigger minder. 1 - Yes, 0 - No.
 * @customfunction
 */
function TRIGREMINDER(next_date) {
  var today = new Date();
  today.setHours(0,0,0,0);
  var nextDate = new Date(next_date);
  nextDate.setHours(0,0,0,0);
  if (today >= nextDate) {
    return "Yes";
  }
  else {
    return "No";
  }
}

/**
 * Fetch people that you need to contact and reach out today and send you a reminder via email.
 *
 */
function sendMail() {

  // Get people you need to contact today
  const sheet = SpreadsheetApp.openById(SPREADSHEETID).getSheetByName('Established Contacts');
  const data = sheet.getDataRange().getValues();
  const rows = data.slice(1);
  var messageBody = '';
  var today = new Date();
  today.setHours(0,0,0,0);
  for (let i=0; i<rows.length; i++) {
    let row = rows[i];
    const category = row[3];
    var last_contact = new Date(row[4]);
    var next_contact = CALDATE(category, last_contact);
    if (today>next_contact) {
      const name = row[0];
      const contact_info = row[1];
      const notes = row[2];
      messageBody = `Hey,<br/><br/>Today you should contact<br/><br/>Name: ${name}<br/>Contact info: ${contact_info}<br/>Notes: ${notes}.`;
      index = i+2;
      const tempo = sheet.getRange(index, 5, 1, 1);
      tempo.setValue(today);
      break;
    }
  }

  // Get people you need to reach out today
  const sheet_potential_contacts = SpreadsheetApp.openById(SPREADSHEETID).getSheetByName('Potential New Contacts');
  const data_2 = sheet_potential_contacts.getDataRange().getValues();
  const potentials = data_2.slice(1);
  let contacts = [];
  for (let i=0; i<potentials.length; i++) {
    const row = potentials[i];
    if (row[3] !== 'Yes') {
      contacts.push([i, row[0], row[1], row[2]]);
    }
  }
  if (contacts.length>0) {
    const record = contacts[Math.floor(Math.random()*contacts.length)];
    const name_reachout = record[1];
    const contact_info_reachout = record[2];
    const notes_reachout = record[3];
    messageBody += `<br/><br/>Today you should reach out<br/><br/>Name: ${name_reachout}<br/>Contact info: ${contact_info_reachout}<br/>Notes: ${notes_reachout}.`;
    const index2 = record[0] + 2;
    const reachout_yet = sheet_potential_contacts.getRange(index2, 4, 1, 1);
    reachout_yet.setValue('Yes');
    const reachout_date = sheet_potential_contacts.getRange(index2, 5, 1, 1);
    reachout_date.setValue(today);
  }

  // Send out the reminder via email
  if (messageBody!=='') {
    MailApp.sendEmail({
      to: EMAILADDRESS,
      subject: "Today's networking tasks",
      htmlBody: messageBody
    });
  }
}
The only thing you need to change in the code is ‘SPREADSHEETID’ and ‘EMAILADDRESS’. You need to exchange the values of these two variables with your own. You can get your ‘SPREADSHEETID’ by checking the url of your current Google Sheets file. Take ‘https://docs.google.com/spreadsheets/d/1OCu0LAvaREvhwsldfjdlskfjAhmmpA2OM3-kv1S1Q/edit#gid=0’ as an example, the ‘SPREADSHEETID’ will be ‘1OCu0LAvaREvhwsldfjdlskfjAhmmpA2OM3-kv1S1Q’. And ‘EMAILADDRESS’ is the email address that you want to use for receiving email notifications everyday.
Step3 - Setup Automation
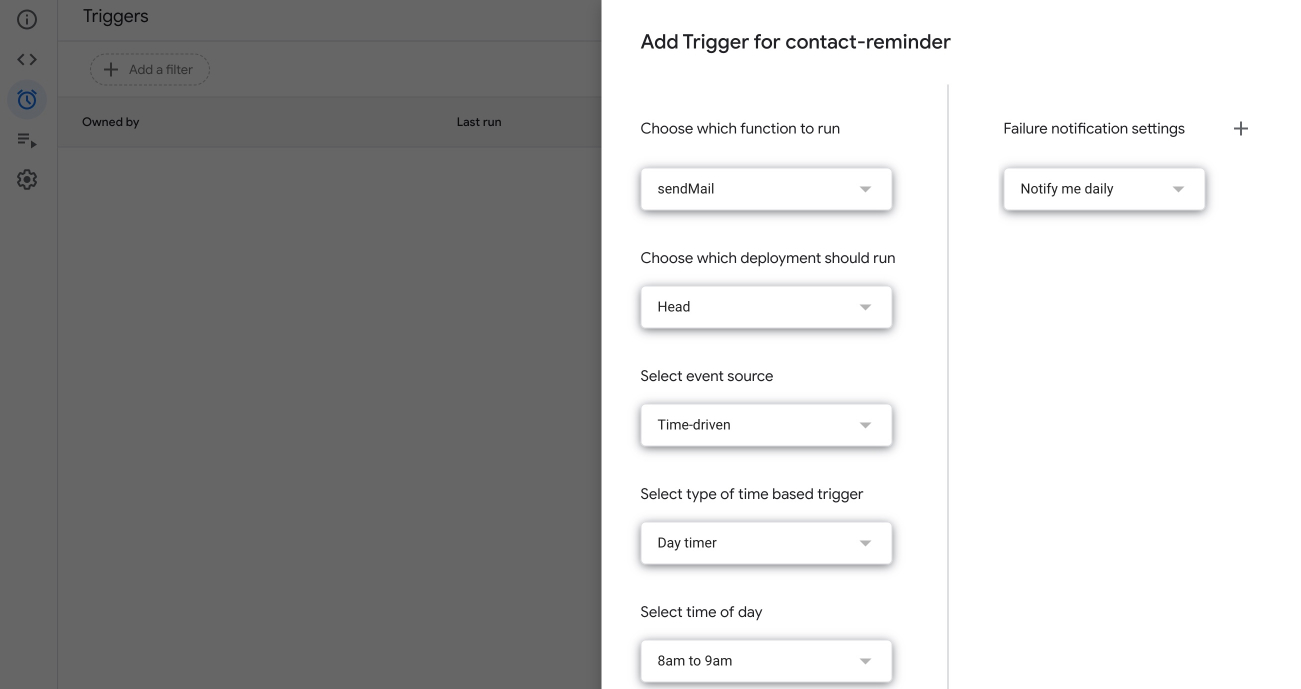
Now move the cursor to the navigator bar on the left and click the ‘alarm clock’ icon. Setup values as the screenshot shows below. You can choose whichever value it provides for ‘Select time of day’. It controls the time when you receive the email notification. I’m using ‘8am to 9am’, which means Google will send out the email to my inbox during this time range.
Then you click save. It will popup a dialogue asking you to login your Google account. After you login, you need to click ‘Advanced’ and then click ‘Go to contact-reminder (unsafe)’. You need to click ‘Allow’ to give it permissions so that the program can actually send out emails.

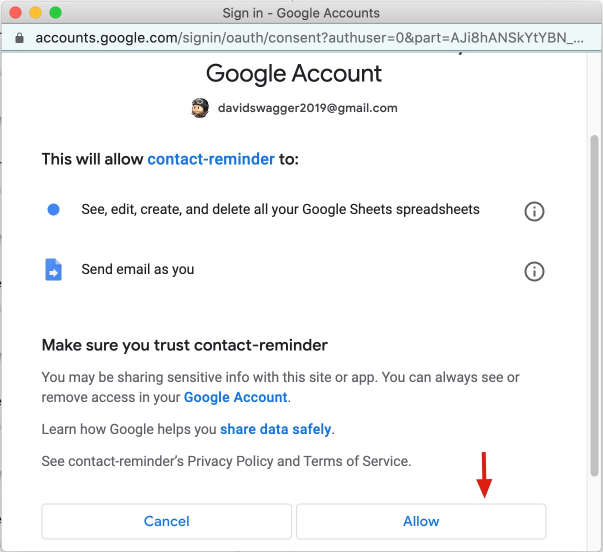
It’s safe to grant permissions to this program because it only contains the code that you pasted before without using any third party add-ons. The program will only view and edit the Google Sheets file that you assigned in the code. If you still worry about the safety, spent some time reviewing the code and figure out how it works. The code is very simple.
Step4 - Add contacts
Now you can put all your established contacts into the ‘Established Contacts’ sheet and remember to input the last time you contacted them in the ‘Last Contact’ column. If you don’t remember, choose any date you prefer. Just don’t leave it empty.
And also put all people that you want to reach out someday into the ‘Potential New Contacts’ sheet. For this sheet, remember that you should leave ‘Have Reached Out’ and ‘When Reached Out’ empty because they’ll be filled in automatically.
And that’s it. Now you can expect an email sent to your inbox everyday reminding you which one you should contact and which one you should reach out.
You need a simple automatic system to keep in touch without relying on your memory. And here I’ve shown you how to build one without spending a penny. If you know how to program or plan to learn, which I highly recommend you to, you can tweak this system in any ways you like so that it can meet your own needs.
PS: Looking for more? Follow me on Twitter to see which project I’m working on right now!